This post provides some brief description of home wiring with the help of a few pictures. This time it will be just a basic description, a skeleton that can provide a structure for my future posts on this topic. Future post will explain in more details.
Picture 1 - Incoming electricity supply cables on concrete poles
=================
RELATED ARTICLES: A simple electrical installation | Electrical socket extension unit | 1- Phase ELCB connection pictures | Bare fluorescent light pictures | Recessed down lights installation | Bollard light pictures | Light switch installation pictures | Home wiring pictures | Electric Meters | Electrical Grounding Electrode Pictures | Most Basic Principles of House Wiring | MATV antenna bracket pictures
=================
The electrical current that goes into our home comes from the electricity supply company's distribution network, usually in the form of overhead cables running on concrete poles (Picture 1 above) or using cables buried one meter below the ground.
When the cables reach a residential house, they usually enter the house through the front entrance and connect to a meter panel (See Picture 2). Together with the meter on the panel is also a cut-out fuse. The meter and the fuse usually belong to the supply company.
From the meter panel the electrical cables are routed to the home electrical panel. On the panel is usually an isolation switch, a leakage protection circuit breaker and a few outgoing fuses or outgoing circuit breakers (See Picture 3).
From the outgoing fuses or circuit breakers the wiring cables run above the ceiling, inside or on the surface of the wall, or concealed inside the concrete floor to go the lamps, ceiling fans, socket outlets and other equipment like the toilet exhaust fans in our homes.
When a home user connects an electrical appliance to a socket outlet, the connection is usually made by the use of an electrical cord. One end of the cord has a plug unit (sometimes the plug unit contains a fuse) that is inserted to the power socket (i.e. wall plug). The other end will be plugged to another socket already built-in on the appliance.
Now and then the location of the electrical appliance needs to be quite a few meters away from the wall socket outlet. The electrical cord provided with the appliance is usually between one to one and a half meters long. In these cases home users usually purchase an extension cord to connect between the wall socket and the appliance's electrical cord (Picture 4 shows an example of electrical extension cords).
From the viewpoint of the electrical current flow, the supply uses only two wires. That is why in some countries or regions we can see only two big wires coming down from the electric pole to a house. One of them is called the live wire, "hot" wire or phase wire. It is this wire that is "dangerous".
The second wire is called the neutral wire or the "return" wire. The electric current flow into the house will come out again (i.e. return) in the same magnitude and goes back into the supply company's transformer or generator. This electrical path forms a complete "loop", like a circle. The continuous and circulating flow of this electrical current is what makes the filament inside the house incandescent lamp burns and produce light that brightens our house.
This behavior of the home electrical system brightens and enriches our lives. When used and handled properly, electricity is very useful and friendly. It is however very powerful and dangerous, and therefore must be treated with respect.
With the two wires described above, we can have electricity in our home that can keep our food fresh in the refrigerator and replace the candles to light up the house during the night.
However with just these two wires, it is like driving a car at high speed without the brake. Driving the car without a brake is extremely dangerous even on an empty freeway that has no traffic light for hundreds of kilometers at three in the morning. As in driving, we need to step on the brake now and then to slow down, or during an emergency.
In a home electrical wiring system, this braking is accomplished through a third wire, the earth wire. Many electrical terms are commonly used for this wire such as earthing wire, ground wire, chassis wire or protective wire.
In a house, this earth wire is almost always colored green or green with yellow stripes. The wire connects the metal casing of the electrical appliance in our homes to the "earth body". (Really, it is actually connected to the huge mass of the earth.)
When the "hot" or live wire somehow come into contact with the outer metal casing of your washing machine, for example, then the fuse at the distribution board will immediately blow, stopping the current flow to the metal casing of the washing machine so we do not get the shock, a fatal shock actually. Where the distribution board uses a circuit breaker instead, the circuit breaker immediately trips, cutting off the supply just like the fuse does.
If the green wire is broken, or it does not connect properly along its path to the earth body, then the electrical power has no brake. The person touching the washing machine's metal casing can get electrocuted.
So do treat the electrical wiring and electrical appliances in your home with respect. Safety comes first. In future articles I will explain more on the "earth wire" and I will also give more tips and techniques on how to make sure your home electrical system is safe for you and your family.
Picture 1 - Incoming electricity supply cables on concrete poles
Picture 2 - Supply authority's meter panel at house entrance or main door
As you can see in Picture 1, the cable coming from the concrete pole is a twisted two-core cable. Two-core means there are actually two lengths of cables in the cable set and they are twisted around each other. The twisting construction of the cable is primarily to make it better to handle, more flexible to bend around and also make it to install on to of the electric poles.
Observe that the cable run along the terrace houses just below the ceiling at the external front wall of the houses. That's why you see in Picture 1 that the cable drops from the concrete pole to only the first house unit in that row.
The energy meter is located approximately near and above the main door, just outside the house. The utility company's meter readers can read the meter every month without disturbing the house tenants. The meter you see in the picture is one of the conventional types. The meter reader needs to get close enough to be able to visually read the meter reading.
However nowadays a much more hi-tech type of meter is getting more popular. I will provide you with a picture of this type soon. The new type is more like a remote control kind of thing. The meter reader does not need to read the energy meter visually. He carries with him a handheld unit the size of a walkie-talkie.
In front of the house main gate he just points the device towards the meter unit and presses the "read" button. The data of the meter is transmitted automatically to the handheld unit, and the latest energy bill is immediately issued to the home customer. He does not have to open the house main gate to get close enough to the meter on the wall to read it.
Back to the meter panel. The supply is tapped off from the horizontal cables, and run down to black components near the meter. One is the service fuse and the other is the "Neutral" link. The meter is separated from the incoming supply by these two components.
So when you do not pay the electricity bill, the company takes off the service fuse and takes it back to their office. So the electrical circuit is broken on the "Live" side, cutting off the supply. The good news is your electric meter will not go up any more.
From the meter unit, two wires will connect the meter to the consumer electrical panel inside the house, which is also called the consumer unit or distribution board (DB). You cannot see the connection between the two because connection to and from the meter is done inside the wooden panel that is used to mount the meter, fuse and the neutral link.
From behind the wooden panel the cables run concealed inside the wall to the electrical panel. The cables can actually be run on the wall or ceiling surface, but in the example inside the pictures, they are run concealed inside the walls.
Picture 3 - Home electrical panel
Picture 4 - Electrical extension cords
Picture 5 - Electrical appliances connected to wall socket
Picture 6 - The green "earth wire"
I know a few more pictures will help some readers understand the house wiring better. I will upload a few more suitable pics as soon as I can. There will also be more comments to the pictures similar to what I have done to Picture 2 above. But I have to rush off now.
Will see you again after a few days.
Note: You can also see more pictures of electrical wiring by visiting this post, Pictures of electrical wiring.
Copyright Electrical Installation Wiring Pictures - Home wiring pictures
Electrical basics for beginners | Understanding electrical installations and wiring through pictures | The concepts behind electrical room design and substations
Wednesday, October 14, 2009
Monday, October 12, 2009
Electrical conduits and trunking pictures
Below are a few pictures of electrical conduits and trunking running above ceiling.
You can also see in the pictures some red painted pipes. Those are fire protection pipes.
So why do I show you these pictures?
This is a very important point here from the point of view of electrical safety, which is the coordination between the electrical trunking and the fire protection pipes during construction or installation.
Those pipes carry water. Sooner or later in their lifetime, the pipes may leak (probably at the joints or at the valves).
The leakage water may travel along the length of the pipes whether vertically or horizontally.
================= RELATED ARTICLES: Underfloor trunking below structural rebars | MATV trunking riser | Lighting flexible conduits | Conduit to trunking connections | Cable ladder pictures | Electrical panel under water pipes | Electrical busduct installation pictures | Electric conduit installation pictures | Electric trunking installation pictures | Electric Panel Installation Pictures | FR electric cable installation pictures | Multi storey building electric closets | Underfloor trunking pictures | Site-fabricated electrical trunking | Electrical Services Color Codes | Light switch installation pictures | Electrical installation pictures
=================
The electrical carry live electrical wires in their normal operation. What happen if the pipes are installed above the trunking when they cross each other?
The water may drip onto the trunking. Then it may enter the trunking through whatever holes that may be there (i.e. screw holes).
Once the water drops are on the trunking, it may travel along and directly enter the electrical panels.
If you observe carefully, the 90-degree vertical bends of the trunking at the wall on the right of Picture 3 are actually where they are going to the electrical panels mounted on the wall (the electrical panels are not mounted yet).
Small quantities water leaks can travel quietly into the electrical panels and damage the electrical components inside the panels.
It is not likely that a service electrician will get electric shock from this situation because service people are alert by training.
What if the leakage water travels from the electrical trunking into conduits that are serving socket outlets or other final circuits (See Picture 4)?
Picture 4 shows some conduits that tap off directly from the trunking. Some of these tap-offs present easy flow of any liquid from the trunking into the conduit.
Before long the water may reach socket outlets and then quietly travel to the floor. At this stage, the hazard is deadly to any unsuspecting occupants of the space. It is no longer just a nuisance.
Picture 1 - Electrical trunking vs. fire protection pipes
Picture 2- Electrical trunking vs. fire protection pipes
Picture 3- Electrical trunking vs. fire protection pipes
Picture 4- Electrical conduit and trunking
To conclude this post, never install or allow to be installed, electrical conduits or trunking below any pipe that may carry water at some time in its operation. Even at crossings.
Make sure the pipes always go below, not above.
See you in the next post.
Note: You can see more electrical pictures at Electrical installation pictures. If you are looking for pictures of temporary electrical installations, visit this post, Temporary electrical installation pictures.
Copyright Electrical Installation Wiring Pictures - Electrical conduits and trunking pictures
Electrical panel pictures: The earth was missing
The following pictures of a temporary electrical panel show another common type electrical hazard at construction sites. I took these photos at a building construction site about four months ago.
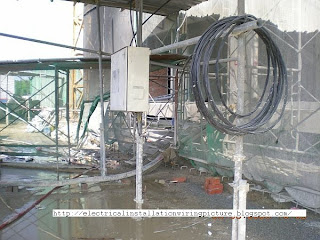
This panel was located under a shade at the concrete mixing station of the construction site. As you can see, the location of the electrical panel was full of water. No, it was not due to rainwater. The location was always that way, because the plant consumed a lot of water daily. The situation presented a very high risk of electrocution not just to the worker operating the concrete mixing plant, but also to other workers.
Someone at the site told me that the electrical panel was too high above the water. So there was not really much risk. What do you think?
Picture 1 - Electrical panel location (Click on the picture to see full size)
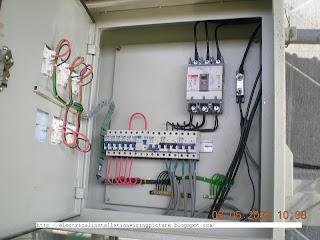
I opened the electrical panel door to check inside (See Picture 2). The panel was a good quality and relatively new. The internal wiring inside the panel was also done nicely and it was neat.
But wait.... Where is the earthing to the panel? There was good earth wiring inside the panel - the green wires. All neatly run and properly terminated to the copper earth bar. But the connection just stopped there. There was no outgoing connection to earth (See Picture 3).
Picture 2- Electrical panel inside view (Click on the picture to see full size)
Picture 3- Earthing copper bar without connection to earth (Click on the picture to see full size)
I checked the incoming twisted cable. It was a four-core. No earth cable anywhere (See Picture 4). I checked around the panel to see if the person who installed it used a different conductor and run it direct to earth somehow. Nope, no other conductor installed.
The conclusion? The electrical panel was not earthed at all. So what happens when there is a considerable leakage current? What protects the worker at the concrete mixer machine there, especially with the wet condition there? Sadly to say... no protection at all.
Feeling exasperated, I checked inside the electrical panel again. Surprise... there was not even an earth leakage circuit breaker there, or any other type of residual current protective device.
Picture 4- Incoming 4-core twisted cable without earth (Click on the picture to see full size)
I have to go now. I will add more info to this post in the near future. I know there are questions in the minds of some of the readers relating to the electrical installation shown in these pictures. The electric shock protection issue can be tricky sometimes.
Until next time...
Note: There are more pictures at this post: Temporary electrical installation pictures.
Copyright Electrical Installation Wiring Pictures - Electrical panel pictures - The earth was missing
Sunday, October 11, 2009
Lighting pictures - Low tech weather-proofing techniques for outdoor lighting
I took the following picture of outdoor lighting to show you a real original technique of custom weather-proofing of light fixtures. These light were installed at a tomyam restaurant by a highway in the east coast. The restaurant was located about thirty kilometers to Kuala Krai from Gua Musang.
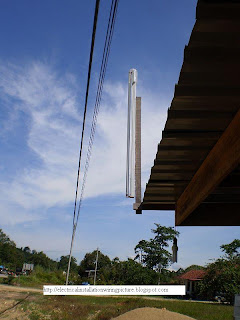
Picture 1 - Improving the IP rating
Picture 1- Here I think the electrician was trying to improve the IP rating of the light fixture. Since the raindrops would come in the vertical direction, improving the top end of the fixture would be a sensible guess. At the price of wiring jobs normally paid by the local population, there were not that many alternative materials available to the rural electrician. However the restaurant was located by one of the busiest main artery roads between Kota Bharu and Kuala Lumpur. So there were plenty of empty cans of soft drink and plastic bottles of mineral water thrown away by road users, especially near popular stops like this restaurant.
So that was the solution for our creative electrician in order to give a quality electrical installation within contract cost paid by his client. The size of the 1.5 liter plastic bottle would give enough diameter for the light fixture. The length was also just nice enough to cover down to the starter unit at the side of the metal casing.
So there you have it. An increase of the IP rating for the fluorescent light fitting. It now become a weather-proof, outdoor type so the owner did not need to spend the extra money for a factory manufactured outdoor light fixture.
The electrician has done a very good job. The client was happy and was more than willing to recommend him to others who were looking for a good electrician. This was really a good advertising for the electrician since it was a very popular restaurant by a main highway. The satisfied customer himself was the owner of a restaurant in a rural area, which means he was also a reputable source of information for whoever was looking for anything.
I think that is enough for today's lesson. However I am feeling generous today, so I have decided to throw a bonus. Look at the picture below.
Picture 2 - Providing a shade over a fixture with low IP rating
Here our electrician wanted to show off his skills further more. It was also at the same restaurant, but at another corner of the metal sheet roof.
Instead of improving the IP rating of an electrical appliance or equipment, we can use a low IP rating type but provide a shade over it so the rainwater from above would have no effect. So that was what our electrician did. He provided a metal sheet roof over the light fitting.
Well, I will not elaborate further. A picture says a thousand words.
See you in the next post.
Copyright Electrical Installation Wiring Pictures - Low-tech weather-proofing techniques for outdoor lighting
Temporary electrical panel and cords pictures
Below you'll find a few pictures on temporary electrical panels, sockets, power plugs and extension cords. I have added comments below the pictures on aspects that I think are important. Further comments will be added when I think of something readers may be interested to know.
Remember that I am sharing pictures of real electrical installations at real construction sites. This is the way I share my knowledge and my experience with the readers.
Beginners, please take note. Whatever are shown on all these pictures are materials for you to see and think. Maybe also for references in your own works, or in engineering classes.
Just because I show a picture here does not mean I am recommending a way or a method as shown in the picture, unless I specifically say so.
Picture 1
===== RELATED ARTICLES: Temporary electrical installation pictures | Temporary Electrical Earthing Pictures | 1-Phase ELCB Connection Pictures | Temporary Electrical Earthing Pictures |
===========
Picture 2
Picture 3
Is there anything wrong with the electrical installation in these pictures? The temporary panel seems to be quite new and definitely in a good condition.
You may question about the mounting method for the panel. But this is a temporary panel for a construction site.
At times, the subcontractor need to move the panel from one place to another every few days.
So fixed wall mounted method is not a practical choice this circumstances.
Yes you may want to suggest that the mounting stand be made of a much better material and design. That I would agree.
The supply cables to the panel seem to be four single core cables. I don't know what size just by looking at the cable from a distance, even though an electrician might be able to give a good guess. Four core means three phases plus one neutral.
You can also see two very good-looking wires with green insulation twisting along the four-cable bunch.
These must be the earthing wires, or Circuit Protective Conductor to be precise.
Is the total cross section sufficient of the earth wires sufficient?
I am a bit rusty on this nowadays. But temporary electrical supply only need residual current protection as the shock protection.
The green wires seem like 4 square mm. Two of them will give 8 sq.mm. I think that should be enough.
Of course the required cross section of the earth cables depend on the distance of the temporary panel to the earth electrodes.
That basically covers the electrical panel and the incoming supply cables. Now lets look at the outgoing circuits from the panel.
First the socket outlets, or the receptacles as the Americans say it.
They seem to have the original SIRIM sticker on each of the sockets. In any case, all the sockets are new, so there should not be much issue about them.
However, what has been plugged into each of the sockets is a different matter.
The appliance connected to the right socket of the lower row should be okey. I think it's the charger for a walkie-talkie. All factory manufactured and all new.
However, the cords connected to the other four sockets may have some serious safety issues. I will add comments on these in the near future.
Have a nice day.
Update February 2010:
I have these pictures of a temporary supply assembly hanging around at my old blog which is not very active anymore. I thought maybe it is better to put it here so it can be of benefit to someone.
Below are the pictures of the temporary electrical assembly. It was taken at one of my projects a few years ago.
What you see in the picture is the floor temporary sub-switchboard, which sits on the left of the assembly.
Next to it is the temporary DB with an on-board three phase isolator and a few 13A switched socket outlets.
Picture 4 – Temporary supply panel
Picture 5 – DB earthing busbar
Picture 6 – Three-phase temporary ELCB
The project was a multi-storey residential building and the temporary supply was taken from the temporary main switchboard at the ground floor.
The authority's meter panel was installed at the main switchboard.
So twisted 4-core submain cables was run from the main switchboard to each sub-switchboard at individual floors (one sub-switchboard for every three floors actually).
Since it was a 21-storey condominium, seven sub switchboards were installed.
From each sub-switchboard, cables were run at high level to distribution boards at various locations at the three floors in its coverage.
Back to the picture… So, what is so special about the electrical board assembly in the picture?
This is one example of the usual practices in the installation of temporary electrical supply at construction sites in our country.
Not all construction sites are like this example, of course. Many job sites practice very good safety standards and I can personally testify to that, but quite frankly the practice shown in the picture is quite common.
In this case, I have seen one situation that I have never seen. The picture may not be very clear, but I hope you can see that the incoming cables to the floor sub-switchboard are only four-core.
It has NO EARTHING at all.
I joined the supervision team while the work was already quite advanced with only a few month left to the completion. The temporary electrical supply has been in operation for almost a year.
The electrical sub-contractor has also been on board for many weeks. Yet, the electrical supply distribution from first floor to top floor at Level 21 has no earthing.
I was shocked when I notice this on my second day at site. It was unbelievable. Some unlucky workers could have died from this oversight.
The 25 by 3 mm earthing copper tape was finally installed later, after many days of my urging them to do it. The distribution boards and the temporary cabling were also much improved.
Note that the 3-phase ELCB already has a label below the TEST pushbutton that says “Test Monthly”.
I do not know whether anybody actually did the test or not, but if they did, the test by the ELCB pushbutton would not be able to detect a missing earthing connection. Read this post, 1-Phase ELCB Connection Pictures, to know more.
As you can see, apart from the earthing conductor, obviously a few more things were wrong with the distribution boards, the cabling and the plug and sockets in the picture.
Maybe we can talk again about these in my future posts.
For now, I just wish to emphasize the importance of checking the temporary electrical supply installation at your construction sites.
Do not assume that the main contractor of a RM230 million building project will have enough people to look at safety matters as important as this one.
Copyright http://electricalinstallationwiringpicture.blogspot.com/ Temporary electrical panel and cords pictures
Thursday, October 1, 2009
Electrical Installation and Wiring Pictures
Welcome to Electrical Installation and Wiring Pictures.
In this blog I will share with you some photos on electrical installations, and wiring works. They are real and actual works of electrical installations and construction.
A picture says a thousand words. But I will be giving you lots and lots of photos. So you will be able to get truckloads of information on electrical works from this blog.
Pictures however cannot replace words. Some things can only be said with words.
Therefore I will drop some comments and attach them to each of the pictures that I upload.
If and when I see some new aspects that I think will be useful to the reader's understanding of anything in a picture, I will add the additional comments as an update so that you will know if I have added some things to old posts.
This blog is intended for beginners in the works of electrical construction, installation and wiring.
I have always been trying to find a suitable method to represent the experience that I have gained throughout my twenty-year career efficiently through the internet medium.
I tried writing articles for a while. But it took too much time, and I am not much of a writer. This photography method may be able to help. We'll see.
In any case I hope you will enjoy what I will be uploading to this blog, and that they will be useful for you. This is my way of giving back to the world what this world has given me.
Keep in mind again that they are real construction and installation pictures, not some drama acts of electrical installation works.
Some pictures will show bad workmanship, some may show nice works. While others may show some bad practices by the contractors or their workers and electricians.
Beginners, please take note. Just because I show a picture here does not mean I am recommending a method, a practice, or a technique that is shown in the picture, unless I specifically say so.
These pictures are for you to see and think. They are materials that can be effectively used to grow knowledge of real electrical installations and construction. Or maybe use them as references in your works, or in engineering classes.
Whatever the purpose of use that you have, you must think before you follow.
With that note, I am closing this opening post. If there is something you want to see but cannot find it here, just drop a comment.
Probably I will not reply your messages. But then I know there is something that you need or prefer.
I will try to help when I can.
See you in the next post.
Subscribe to:
Posts (Atom)